QuickBooks is a popular accounting software used by many businesses for everything from basic bookkeeping to advanced financial management. However, like any software, it can run into issues from time to time. One common problem faced by users on Windows 11 is the “QuickBooks has stopped working” error, which can be frustrating and disrupt your workflow.
In this guide, we’ll walk you through some simple troubleshooting steps to get QuickBooks working again on your Windows 11 computer.
👉 QuickBooks not working? Let’s fix it fast! Follow these easy steps to resolve the issue and get back to business.
Need more help? We’re here for you! Let’s get QuickBooks running smoothly again!
Understanding the “QuickBooks Desktop Has Stopped Working” Issue on Windows 10/11

QuickBooks has stopped working is a common issue that can happen for a variety of reasons. You may encounter a pop-up message that says: “QuickBooks has stopped working. Windows can check online for a solution to the problem, or you can choose to close the program.” This problem could arise due to issues like bugs within your QuickBooks program file or if your workstation lacks the necessary computing power to run QuickBooks efficiently. In this article, we will explore each potential cause in detail and provide effective solutions to help you fix the issue.
Top Reasons Why QuickBooks Desktop Stops Working on Windows
There are several potential reasons why you might encounter the issue “QuickBooks Desktop has stopped working”. Below, we’ve compiled some of the most common causes:
- Corrupted QuickBooks files are one of the main causes of this issue.
- Missing or damaged Windows components can also trigger the “QuickBooks Desktop has stopped working” error.
- Using an outdated version of QuickBooks is another common culprit, so it’s essential to keep your software up to date.
- Low system resources, like insufficient RAM or CPU power, can prevent QuickBooks from running smoothly.
- Conflicting programs on your system might interfere with QuickBooks’ operation, causing it to crash or freeze.
- Corrupt Windows Registry entries can easily cause QuickBooks to stop functioning properly.
- A virus or malware infection on your computer might prevent QuickBooks from launching at all.
- If your QuickBooks company file is damaged, it could cause QuickBooks to crash when you try to open it.
- An improper or incomplete QuickBooks installation can also lead to issues with the program not working correctly.
- Having an outdated or incompatible .NET Framework on your computer can also stop QuickBooks from opening.
- A corrupted QBWUSER.INI file can prevent QuickBooks from loading properly, especially if the file becomes too large.
- If your Windows User Account Control (UAC) settings are incorrectly configured, QuickBooks may not be able to start.
- In multi-user environments, issues with the QuickBooks Database Server Manager being outdated or damaged can lead to problems with QuickBooks.
- Hard drive issues or bad sectors can make QuickBooks behave erratically or not open at all.
- Using incorrect file extensions for QuickBooks files might also cause errors when trying to run the program.
- Sometimes, antivirus or firewall settings can interfere with QuickBooks, blocking it from running due to security restrictions.
- An outdated or incompatible Windows operating system can also cause QuickBooks to malfunction.
- A sudden power failure or system crash while QuickBooks is running can damage program files, triggering the “QuickBooks has stopped working” error.
- Lastly, insufficient permissions for QuickBooks files or folders can stop the program from opening or running correctly.
- In multi-user setups, network conflicts can cause issues with loading QuickBooks, especially if multiple people are using the program at the same time.
Now that you have a clearer idea of what might be causing the issue, you’re ready to troubleshoot on your own or reach out to an expert for help in getting QuickBooks up and running smoothly again.
Key Steps to Take Before Troubleshooting QuickBooks Not Responding
Before you start troubleshooting the QuickBooks not responding issue, it’s a good idea to take a few simple steps to make sure your system stays safe and runs smoothly:
- Make sure to back up your company file. This is an important step to protect your data in case something goes wrong while troubleshooting.
- Update your QuickBooks software: Make sure you’re running the latest version of QuickBooks. Updates typically include bug fixes and compatibility improvements, especially for newer operating systems like Windows 11.
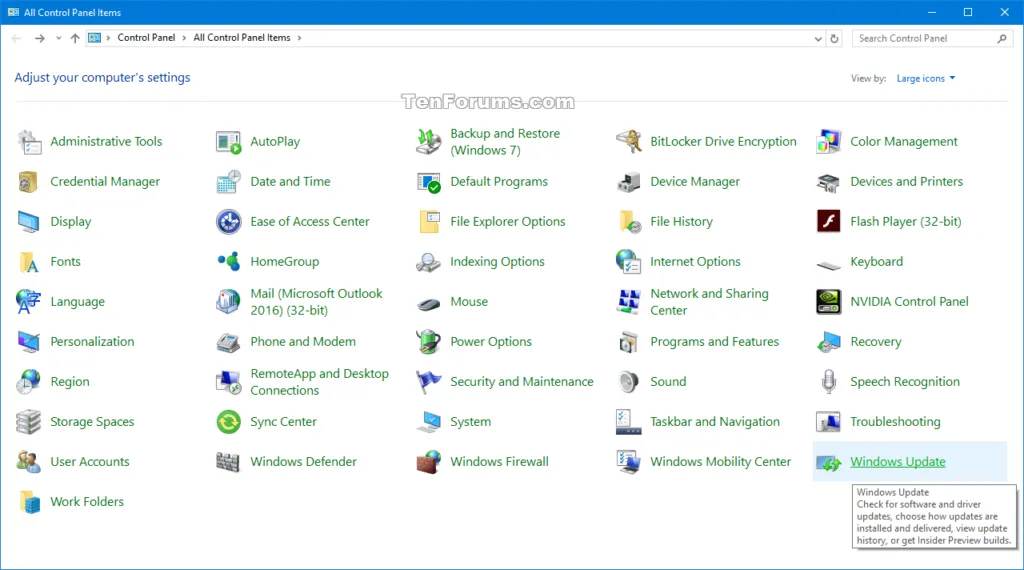
- Check for Windows updates: Ensure your Windows 11 is up to date. The latest updates can fix compatibility issues and boost performance.
Taking these simple steps will help protect your data and make the troubleshooting process much smoother.
Is QuickBooks not responding after login? Here are some effective solutions to get it working again.
Have you ever tried opening QuickBooks, only to find that it won’t respond or load after logging in? It’s a common issue, but don’t worry—there are simple ways to fix it.
Most of the time, this issue happens because of communication problems between QuickBooks and your Windows system. If you’re up for troubleshooting yourself, we’ve put together some easy steps to help fix it. But if you’re not sure or the problem keeps happening, it’s a smart idea to reach out to a professional or contact the QuickBooks support team for expert help.
Simple First Steps to Fix QuickBooks Not Responding Issues
Restart Your Computer: Sometimes, a quick restart can do the trick. Turning your computer off and on gives it a chance to refresh and fix any small glitches that could be causing QuickBooks to stop responding.
Open QuickBooks the Secret Way: After restarting your computer, go to the Start Menu > All Programs, find QuickBooks, and instead of opening it the usual way, try this simple trick:
- Right-click on QuickBooks to access more options.
- Hold down the ‘Ctrl’ key on your keyboard while you click to open QuickBooks.
This method can sometimes bypass the issue and get QuickBooks working again. If it opens without any trouble, you’re good to go! If not, no worries—you’re ready to move on to more advanced troubleshooting steps.
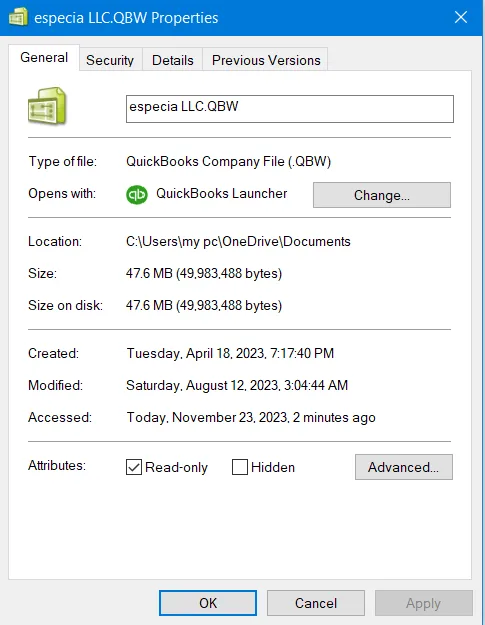
Method 1: Make sure your company file size is within the safe limit.
Why It Matters: Keeping your QuickBooks company file size in check is key to smooth performance. A file size under 1GB helps avoid problems like QuickBooks not responding when opening or working with your file. By managing your file size, you can enjoy faster speeds, fewer glitches, and an overall more efficient experience.
How to Check Your QuickBooks Company File Size: Easy Steps
To check the size of your QuickBooks company file, just follow these simple steps:
- Open QuickBooks and go to your company file.
- Press F2 or Ctrl + 1 on your keyboard to open the Product Information window.
- In the window, find the ‘File Size’ field. It will show you the exact size of your company file.
By following these easy steps, you can easily keep an eye on your file size and make sure it’s within the optimal range for smooth performance.
What to Do if Your File Size Exceeds 1GB: If your QuickBooks company file is over 1GB, it could slow things down. To boost speed and responsiveness, try condensing the file or splitting it into smaller parts. This can help avoid issues like lag or QuickBooks not responding, keeping your software running smoothly.
How to Split Your QuickBooks Company File into Two: A Simple Step-by-Step Guide
Backup Your Data: Before you start splitting your QuickBooks company file, always create a backup to safeguard your data, just in case something goes wrong.
Create a New Company File: In QuickBooks, go to the ‘File’ menu, select ‘New Company’, and follow the prompts to set up a fresh company file.
Transfer Data: Move part of the data from your old file to the new one. This could involve re-entering some transactions or using the export/import features to transfer lists.
Verify and Rebuild Data: After the split, go to ‘File’ > ‘Utilities’ > ‘Verify Data’, then ‘Rebuild Data’ in both the old and new files to make sure everything is intact and free of corruption.
How to Condense Your QuickBooks Company File: A Simple Step-by-Step Guide
Backup Your File: Always start by creating a backup of your QuickBooks company file to keep your data safe before making any changes.
Use the Condense Feature: In QuickBooks, go to ‘File’ > ‘Utilities’ > ‘Condense Data’. Follow the prompts to condense your file, which may involve removing old transactions while keeping important summaries.
Note: Condensing or splitting company files can be tricky and may affect your financial data. If you’re not confident about doing it yourself, it’s a good idea to reach out to QB Data Service Experts for professional help.
This method can help fix issues like QuickBooks not responding when opening a company file, especially if the problem is related to the file’s size.
Method 2: Update Your QuickBooks Desktop to the Latest Version
QuickBooks releases regular updates to fix bugs and improve performance. If you’re having trouble with QuickBooks Desktop, updating to the latest version is usually the quickest and most effective solution. You can easily update it by going to the ‘Help’ menu and selecting ‘Update QuickBooks’. Alternatively, you can set up automatic updates to make sure you’re always using the latest version.
Updating QuickBooks Through the Help Menu
- Open QuickBooks and go to the ‘Help’ menu at the top of the interface.
- From the dropdown, select ‘Update QuickBooks Desktop’.
- In the ‘Update QuickBooks’ window, click on the ‘Update Now’ tab to start the update process.
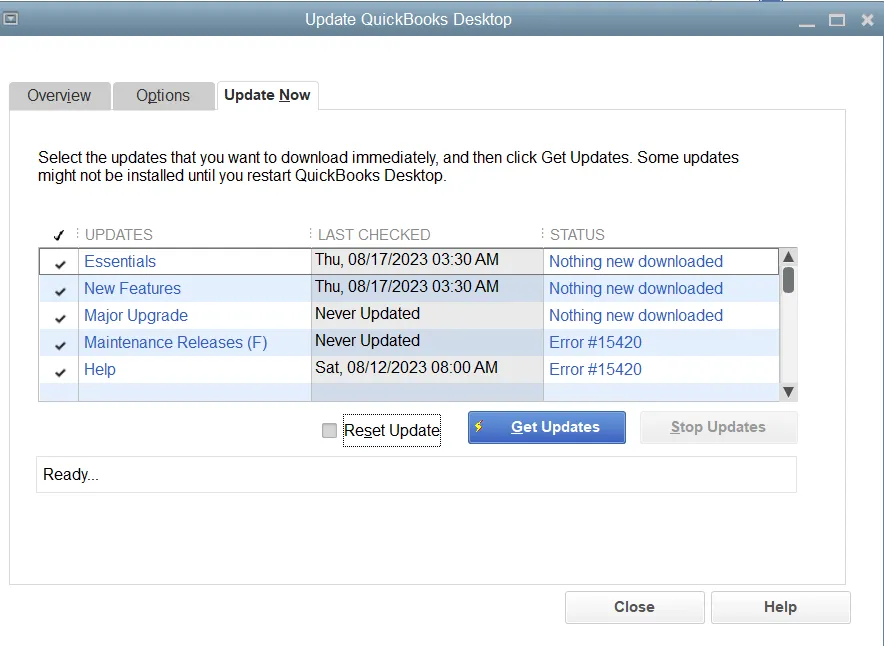
- Click ‘Get Updates’ to begin the download process.
- Once the update is complete, close and reopen QuickBooks.
- If prompted, accept the option to install the new release and follow the on-screen instructions.
How to Set a Schedule for Automatic QuickBooks Updates
- Open QuickBooks and navigate to the ‘Help’ menu.
- Select ‘Update QuickBooks Desktop’.
- In the ‘Update QuickBooks’ window, go to the ‘Options’ tab.
- Choose ‘Yes’ for the ‘Automatic Update’ option to enable automatic updates.
- If you’d like to share downloaded updates with other computers on your network, select ‘Yes’ for ‘Share Download’.
- Click ‘Close’ to finish. From now on, QuickBooks will automatically download updates as they become available.
After updating, check if the issue has been resolved. If you’re still experiencing problems, try Method 2 or reach out to QuickBooks support for further assistance.
Method 3: Repair or Reinstall QuickBooks Desktop to Fix Issues
Sometimes, QuickBooks Desktop may experience performance issues, leading to errors like “QuickBooks has stopped working”. In such cases, repairing or reinstalling QuickBooks Desktop can be an effective solution. Repairing the software focuses on fixing problems within the current installation, while reinstalling involves completely removing the existing version and installing a fresh copy of the software.
How to Repair QuickBooks Desktop on Windows 10 and 11: Step-by-Step Guide
- Close QuickBooks Desktop completely.
- Open the Windows Start menu, type “Control Panel” in the search bar, and select it from the results.
- In the Control Panel, select “Programs and Features” or “Uninstall a Program”.
- From the list of installed programs, find and select QuickBooks.
- Click “Uninstall/Change”, then select “Repair” when the QuickBooks Installer appears.
- Click “Next”, then click “Repair” and wait for the repair process to finish.

- Once the repair is complete, click “Finish”. You may need to restart your computer to fully apply the changes made during the repair process.
After the repair process is complete, check if QuickBooks is working correctly. If you’re still experiencing issues, it may be necessary to uninstall and reinstall QuickBooks Desktop to resolve the problem completely.
Essential Steps to Take Before Reinstalling QuickBooks Desktop
Before starting the reinstallation process, ensure you create a backup of your QuickBooks company file to protect your data. Additionally, have your QuickBooks Desktop download file or installation CD and license numbers ready for a smooth reinstallation.
How to Uninstall QuickBooks Desktop: Step-by-Step Guide
- Open the Windows Start menu, search for “Control Panel”, and open it.
- In the Control Panel, select “Programs and Features” or “Uninstall a Program”.
- From the list of installed programs, locate and select QuickBooks.
- Click “Uninstall/Change”, and follow the prompts to complete the uninstallation process.
How to Install QuickBooks Desktop: A Step-by-Step Guide
- Download the correct version of QuickBooks Desktop from the official website, or insert your installation CD.
- Open the file you downloaded (QuickBooks.exe) or the installation CD.
- Follow the prompts to accept the Software License Agreement, enter your Product and License numbers, and complete the installation process.
If you’re still encountering issues after reinstalling QuickBooks, please contact QuickBooks support for further assistance.
Method 4: How to Run QuickBooks in Compatibility Mode
In some cases, especially after an operating system upgrade, you may experience issues when running QuickBooks. One effective solution is to run QuickBooks in Compatibility Mode. This mode allows QuickBooks to function as though it’s running on an older version of Windows, which can help resolve many compatibility issues.
How to Run QuickBooks in Compatibility Mode: Step-by-Step Guide
- Close your QuickBooks application if it’s currently running.
- Go to your desktop and locate the QuickBooks icon. Right-click on it and select ‘Properties’.
- In the Properties window, navigate to the ‘Compatibility’ tab.
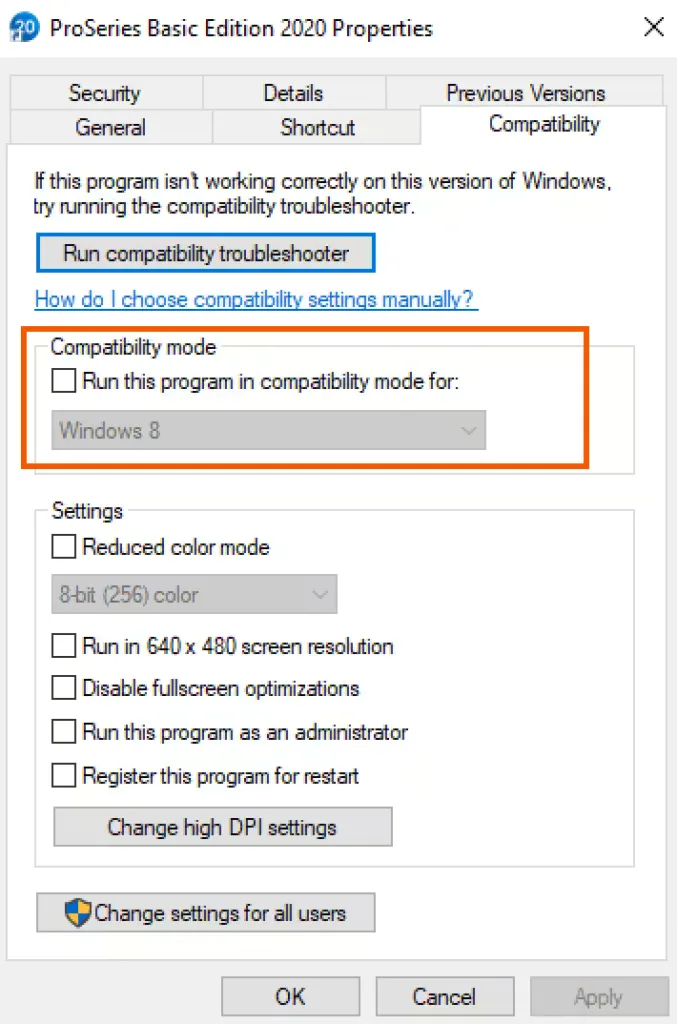
- Check the box that says ‘Run this program in compatibility mode for’, and then select a previous version of Windows from the dropdown list. It’s generally best to start with the version of Windows you were using when QuickBooks was working without issues.
- Under ‘Settings’, check the box for ‘Run this program as an administrator’.
- Click ‘Apply’ and then ‘OK’ to save your changes.
- Try launching QuickBooks again to see if it runs without issues.
Running QuickBooks in compatibility mode can be a helpful workaround for certain issues, but it may not fix all potential problems. If you’re still facing issues after trying this method, consider moving on to Method 5 for further troubleshooting.
Method 5: How to Disable Conflicting Programs to Fix QuickBooks Issues
Disabling conflicting programs is like clearing the path for better system performance. By fine-tuning QuickBooks and eliminating unnecessary disruptions, you can optimize your system for smoother operation. Follow the steps below to streamline your digital space and improve your overall QuickBooks experience.
Steps:
- Press Ctrl + Shift + Esc to open the Task Manager.
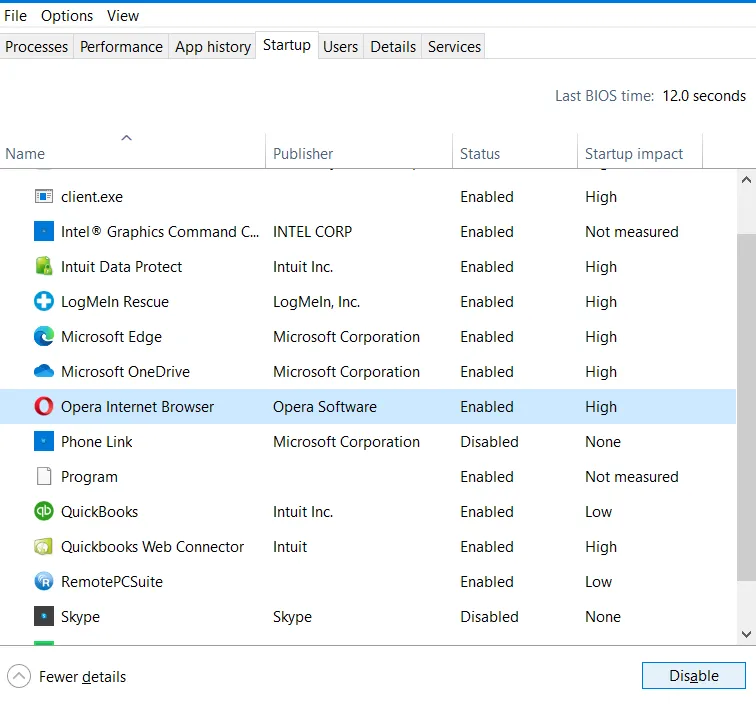
- Click on the ‘Startup’ tab in the Task Manager and look for any programs that might be interfering with QuickBooks.
- Right-click on the conflicting program and select ‘Disable’.
- Restart your computer and launch QuickBooks to see if the issue has been resolved.
Method 6: Scan and Repair Hard Drive if It Has Bad Sectors
Giving your computer a tune-up by scanning and repairing bad sectors on the HDD is similar to how QuickBooks can be customized to fix issues. It’s like patching up weak spots to help everything run smoother. Follow the steps to scan and repair your drive, and both your computer – and QuickBooks – will be in top shape again!
Bad sectors on the HDD can cause issues like QuickBooks has stopped working on Windows 10 and Windows 11.
- Press the Windows key + R and type “cmd” in the Run dialog box. Press Enter to open the Command Prompt.
- Type “chkdsk” followed by the drive letter of the hard disk you want to scan. For example, if the drive letter is E, type “chkdsk E:” and press Enter.
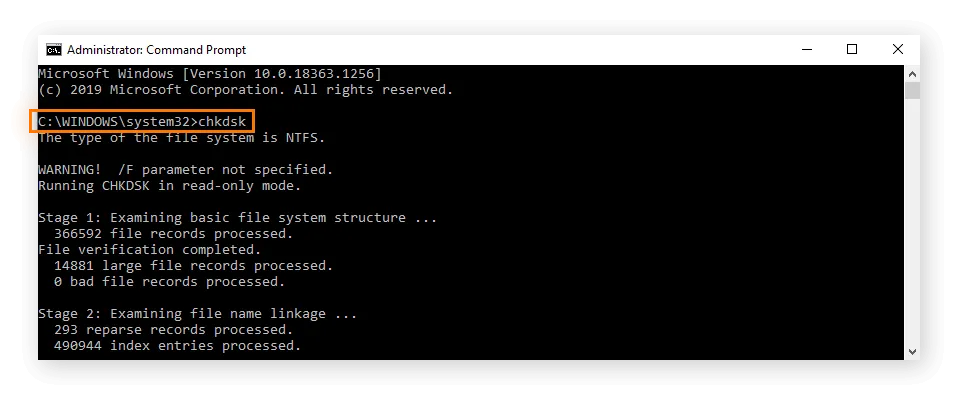
- Type “/f” to scan and fix errors automatically, or “/r” to scan and repair bad sectors. If you choose “/r”, the scanning process may take longer to complete.
- If the hard disk is in use, type “Y” to schedule the disk check to run the next time the computer restarts.
- After scheduling the disk check or if the hard disk is not in use, type “Y” and press Enter to start the scanning and repairing process. Depending on the size of your hard disk and the number of bad sectors, this could take anywhere from a few minutes to several hours.
- Once the process is complete, the Command Prompt will display the scan results. If any bad sectors were found and repaired, it will be mentioned in the results.
Note: Always make sure to back up your important data before performing a scan and repair on your hard disk to avoid potential data loss in case of any unexpected issues.
Method 7: How to Customize the QBWUser.ini File to Resolve QuickBooks Issues
Customizing the QBWUser.ini file is like giving QuickBooks a fresh start, especially if it’s acting up or not opening properly. By tweaking this file, you can reset personal settings that might be causing issues. Just follow the steps to rename the QBWUser.ini file, and you’ll be on your way to fixing glitches and making QuickBooks run smoothly again.
Before you start renaming the QBWUser.ini file, make sure QuickBooks is closed.
- Open the folder where QuickBooks is installed on your computer and locate the QBWUser.ini file. Note: If you’re not sure where QuickBooks is installed, you can use the Windows search function to locate it.
- Rename the file: Right-click on the QBWUser.ini file and select ‘Rename’. Change the name to QBWUser.ini.old or something similar.

- Restart QuickBooks: After renaming the QBWUser.ini file, restart QuickBooks. This will prompt QuickBooks to create a new QBWUser.ini file with default settings.
- Check for errors: Once QuickBooks is running, verify whether the QuickBooks Not Responding issue has been resolved. If everything is working fine, you can delete the QBWUser.ini.old file.
Note: Renaming the QBWUser.ini file may reset some of your QuickBooks preferences, such as window size and location. You may need to reconfigure these settings after renaming the file.
Final Considerations: Key Steps to Ensure QuickBooks Runs Smoothly
If you’re still facing issues with QuickBooks has stopped working on Windows, it’s recommended to seek further assistance from QB Data Recovery Services. Their team of experts can offer more tailored guidance and support to help resolve the problem. For immediate help, you can call their toll-free helpline. Don’t hesitate to reach out and get the expert support you need to overcome the QuickBooks responsiveness issue on Windows 11.
FAQ: Common Questions About QuickBooks Not Responding or Working Issues
Q: What if QuickBooks opens, but nothing shows up on my screen?
Q: Will updating QuickBooks to the latest version fix this issue?
Q: How can I tell if another program is conflicting with QuickBooks?
Q: Why is QuickBooks not responding after I log in?
Q: What should I do if QuickBooks keeps freezing?
What Causes QuickBooks Not to Work on Windows 11?
If QuickBooks isn’t working on Windows 11, it’s usually due to compatibility issues, outdated hardware drivers, or conflicts with other software like firewalls or antivirus programs. To fix this, try updating QuickBooks, checking for any driver updates, and reviewing your security settings or other software that might be causing interference.

ProAccountingHub provides practical guidance on using QuickBooks to manage finances efficiently. Whether it’s tracking expenses or preparing for taxes, their tips help individuals and businesses stay organized and make smarter financial decisions. Focused on the latest QuickBooks features, ProAccountingHub simplifies financial management to help users reach their goals.
